I booked myself a week off work in late Feb and leading up to that date I started to get (back) into Gameboys. As a kid I grew up with a ZX Spectrum in the home and as a teen I had a Gameboy. I actually managed to use paper-round money to buy myself a pretty nice collection of games, but then for some reason sold it all off - only to then want to re-buy a Gameboy. I wasn't so business savvy at that point.
Early on in the year I found that refurbishing Gameboys and modding them wasn't too tricky for my own skills and as Feb started to come around two lots on Ebay piqued my interest: one with 8 Gameboys and another with 14. Of the 14, none worked (according to the seller) and of the 8, one worked (a Gameboy Advanced).
After much stress of bidding, I managed to secure the lots, plus purchased 4 of the worst condition Gameboys from j4u.co.jp and another 4 I (somehow!) managed to buy on Ebay.
So, this is my post to both help me remember what I did, but also if you're interested in getting into a hobby that can reward you with a Gameboy, hopefully these tips can help you too.
Purchasing tips
I'm based in the UK, so pricing is very much based around this. I've jealously seen videos on YouTube of US based people buying Gameboys from flea markets for $5 (which is an absolutely steal). In the UK, on Ebay, you're looking at around £30 for a faulty Gameboy. Somehow these are generally more expensive than Gameboy Color and the Gameboy Advanced.
When buying for refurbishment there's a few areas of service (that I'm going to cover in this post) that I'm specifically looking for:
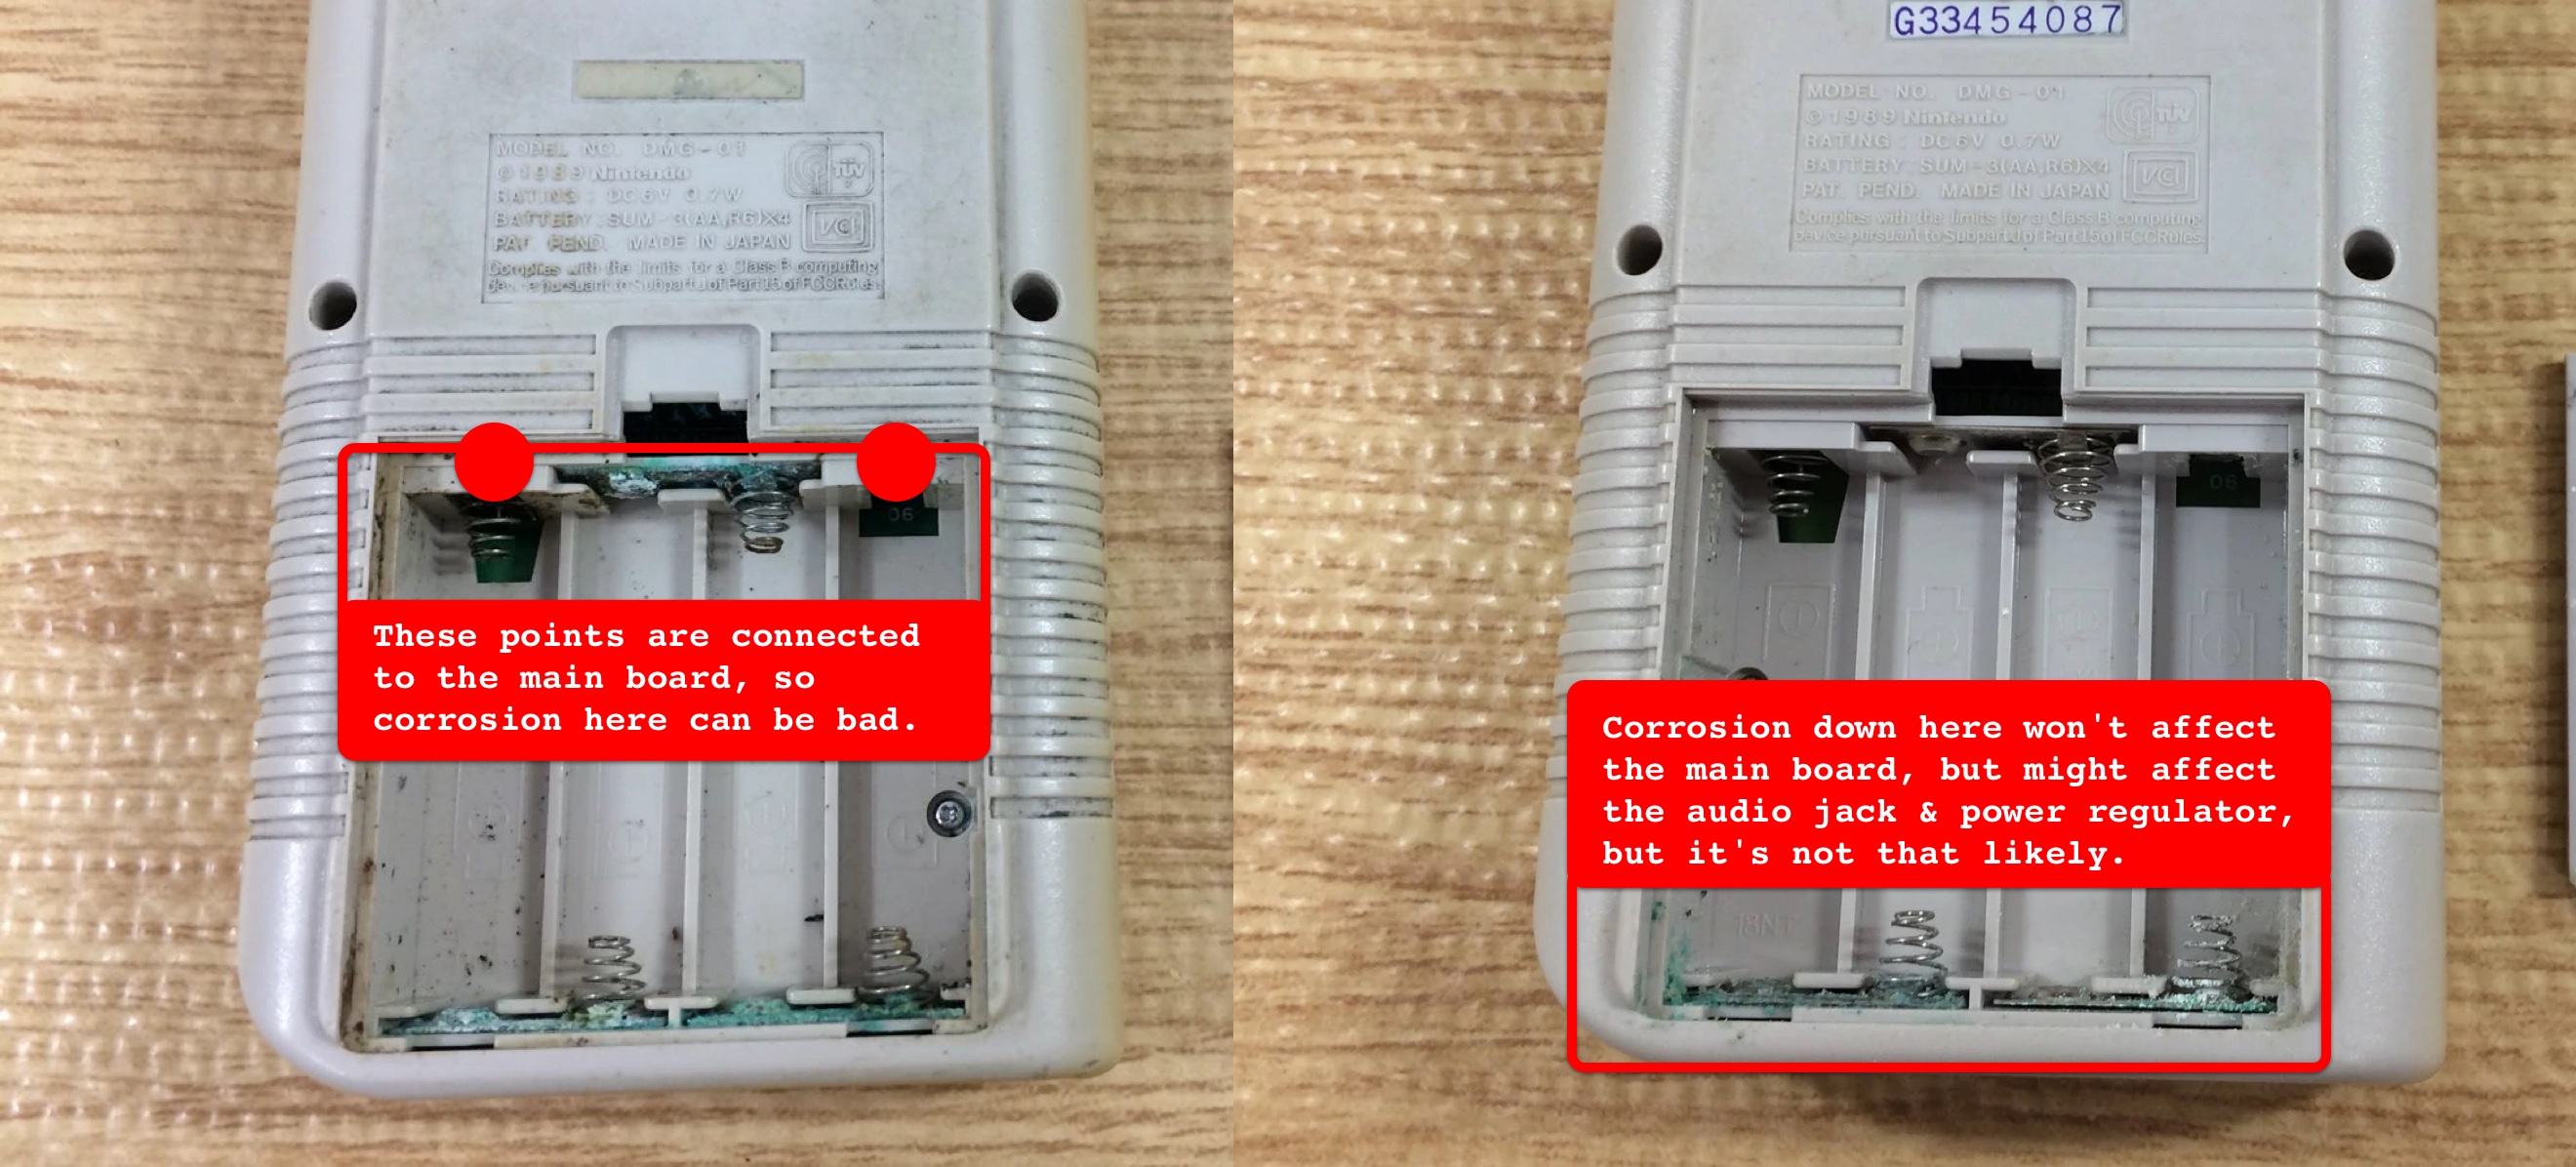
Does it power on? If not - great, it should affect the price and solving power isn't that tricky. However, in a lot of cases it'll be corrosion on the battery terminals and the degree of corrosion can completely write off a Gameboy. I'll go into more detail in a moment, but here I want to see the inside of the battery compartment and I'm looking for corrosion in the top battery contacts. If there's heavy corrosion here, it could also be on the main board which could be irreparable damage.
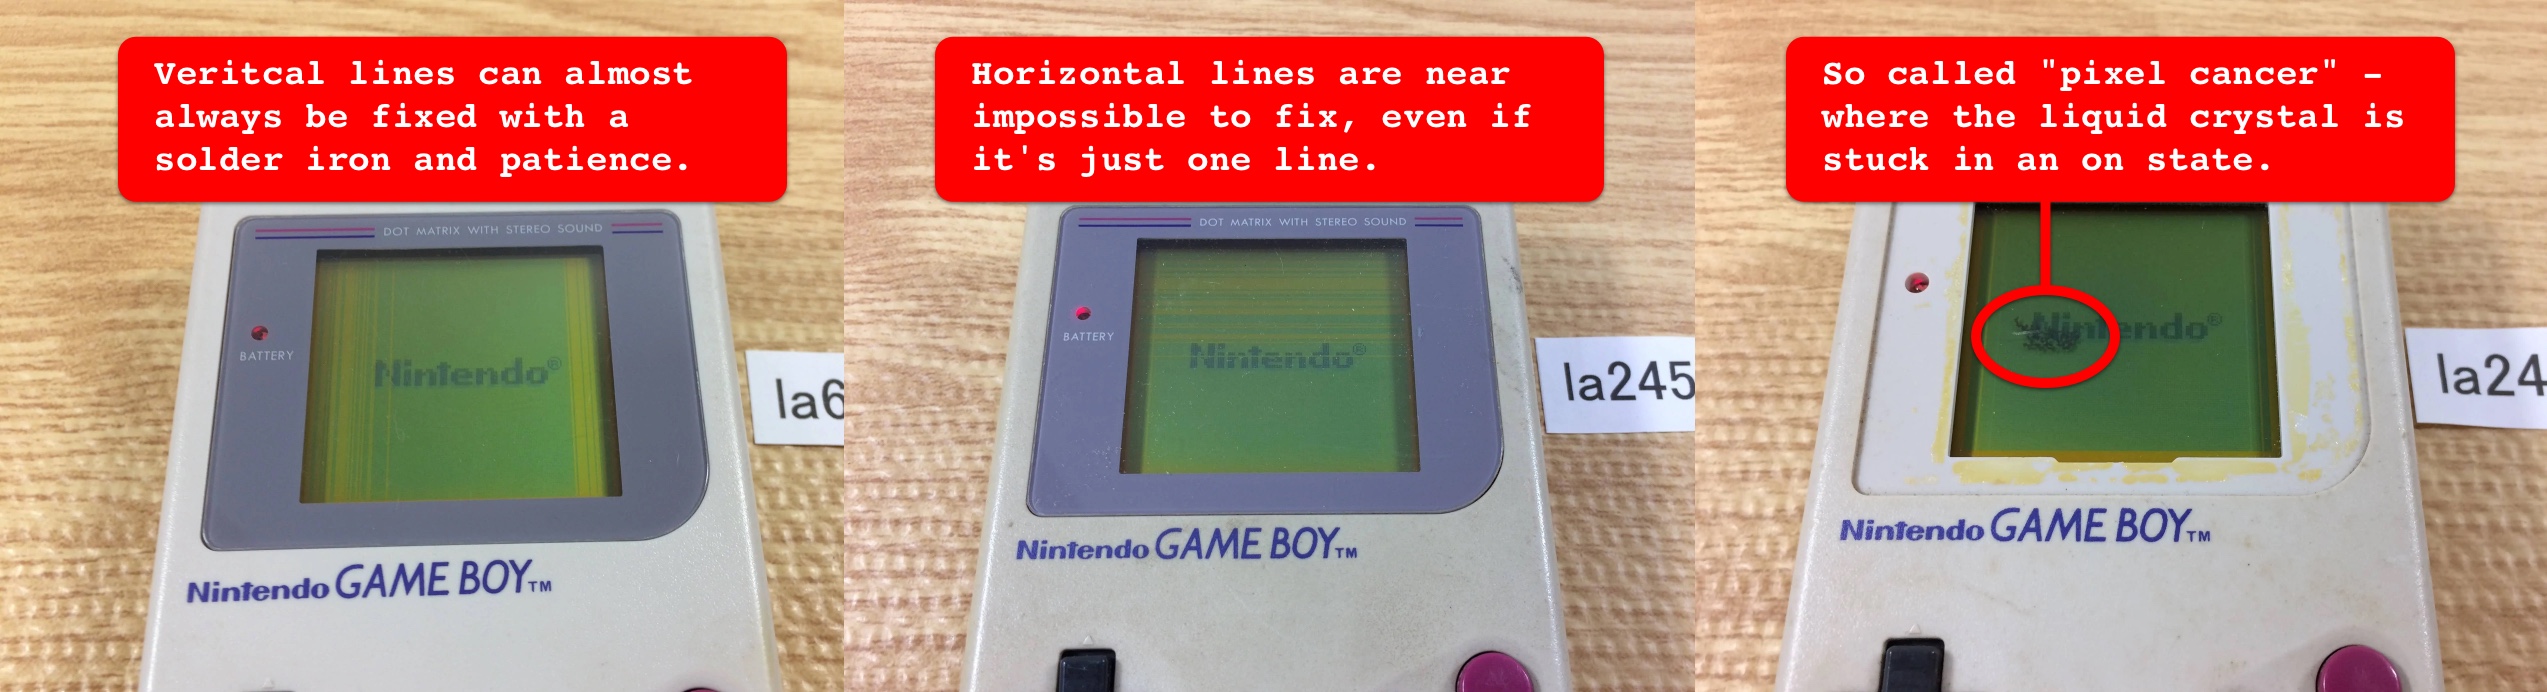
What is the state of the screen? depending on whether you intend to keep the screen or not (removing the screen and replacing with an IPS screen is a nice way to go), this might be a factor. You're looking for lines, either vertical (good) or horizontal (bad), screen burn and pixel cancer (I absolutely hate this term, note to self: even though other people call it this maybe Rem should find another way).
Does sound work? Again, this should affect price, and generally straight forward to fix once you go through all the steps (and again, I'll go into detail).
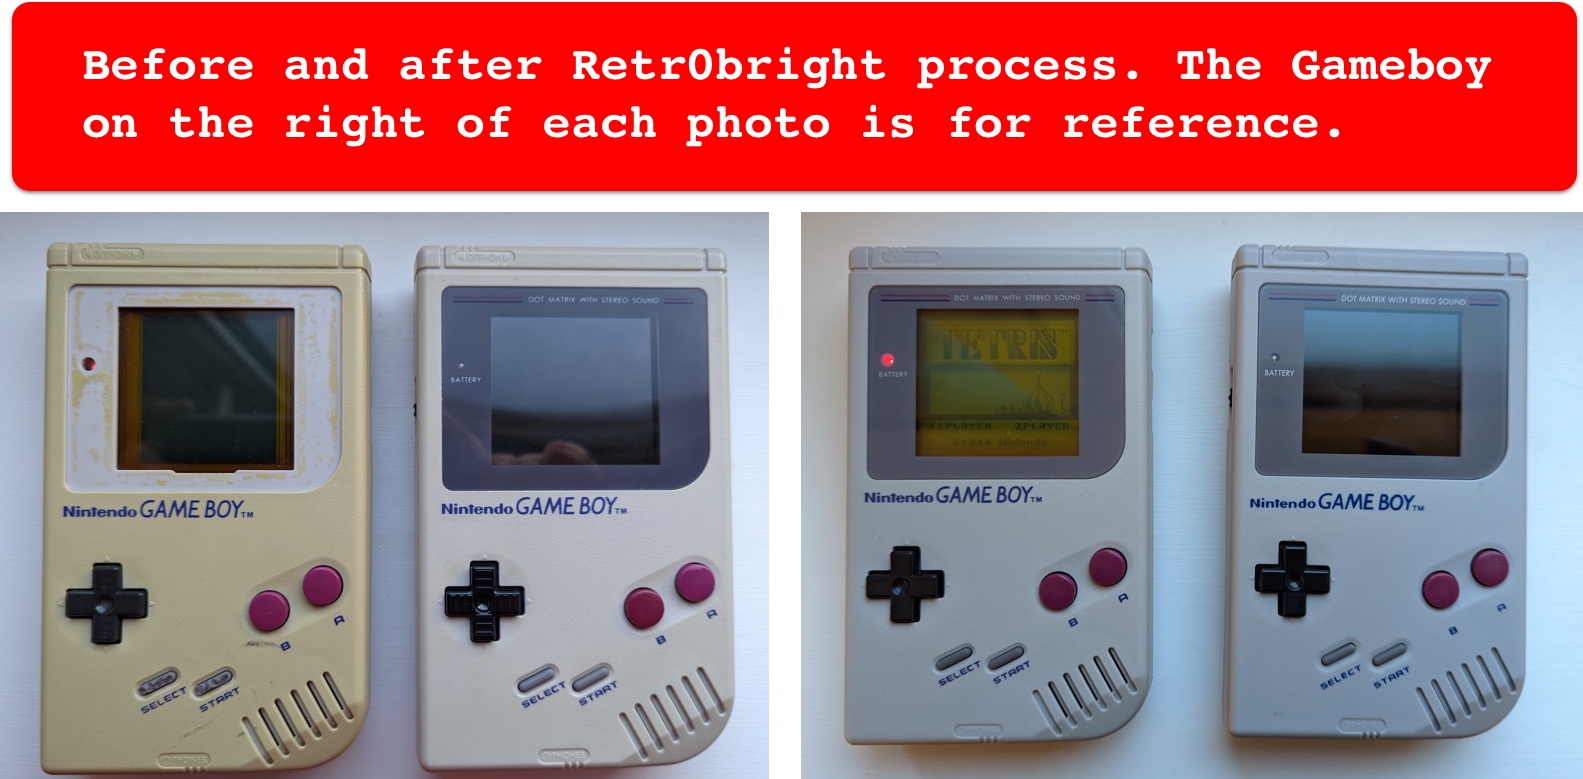
What's the general state of the body? You might want to re-shell the Gameboy, but if you're like me and have an affection for the original beige(ish) shell then checking for damage is useful. If it's dirty, or really dirty, it's fixable. If it's really yellow, it's fixable too using a process called Retr0bright but that requires some amount of kit - or constant sunshine (which in the UK we don't particularly have!).
So once you've got the faulty gameboy, what tools do we need?
Tools
The minimum tools I'd recommend are:
- A multimeter - they're not expensive, and most (that I know of) come with a continuity mode (which checks that there's a solid connection between two points) and voltage reading (to make sure the voltage is right)
- Soldering iron - the more you pay, the better the quality. My first iron was less than £10 and when I upgraded to a £30 iron with temperature control to difference was huge. I also recently bought a new tip (a "Hakko T18-BR02") which was £7 and absolutely worth it
- Isopropyl Alcohol (or IPA which is so much easier to say), ideally above 95% - this is invaluable for cleaning
- Tri-wing ("Y1") screw driver and a philips ("PH1") screw driver. I recently bought the Moray IFIXIT kit and so far it's had every screw bit I've needed for console repair and refurb (including the screw bit to open Gameboy carts).
- 4 AA batteries for testing power
- 3.5mm barrel jack with negative on the centre pole and positive on the outer - important: this the opposite of "standard" barrel jacks (if you're happy with a bit of cutting and reversing the wires a cheap USB to 3.5mm jack can be modded)
- Distilled white vinegar - this helps to remove battery corrosion
Optional extras (though are valuable either way):
- Flux - you can buy flux pens, they're cheap but if can: buy flux paste - I recently started using this and I didn't realise what a huge difference it would make.
- Solder wick can come in useful if you're de-soldering like the battery terminals - though both solder irons I bought came with a solder sucker which works most of the time.
- Either a extractor fan of some kind or at least some N95 face masks - you might find you're melting 30 year old solder and you really don't want to breath that in.
- Flush cutters if you intend to add an IPS screen (you'll need this to cut inside the Gameboy shell to make room)
- If you want to retrobrighen, watch this video and purchase the appropriate bits (black light, Hydrogen peroxide, tin foil and a clear box/bucket).
I'm sure there's more tools I use, but those are good starting points.
Fixing
There's really three main areas of fixes, though you'll get the odd Gameboy that is much more technically challenging (which I find fun) and it's not just a case of fixing power (like this Gameboy Pocket I had fun with recently):
- Power
- Screen
- Sound
But, this post is already long so I'm going to split up the actual fixing process up into further posts (plus, I'm still trying to work out how I translates a large flow diagram that's in my head into something actually readable!).
In the next few posts, I'll go into detail how I've addressed and diagnosed each of these three areas.
In the meantime, watch this space (or my twitter space) if you wanted to buy one of the refurbished handhelds from the 90s (or skip the queue and ping me directly).