A little while back I saw a technical demo that used the shell of MIDI controller and inserted a PS/2 keyboard (effectively) under the keys to then control a program on the ZX Spectrum Next.
This prompted me to buy a MIDI controller but I didn't want to gut out the new hardware. So instead I found a way to map the USB MIDI to the PS/2 key presses, allowing me to use the piano keyboard on the retro hardware.
These posts (I'm hoping for three of them) is a tutorial on how to get your own USB MIDI controller talking to a PS/2 interface.
However I'm also intending to build these for others on demand only asking for the components and postage to be covered. If that's something you're interested I've set up an enquiry form here.
TL;DR
- Buy the USB host controller, a Pico and a 6-pin mini DIN plug
- Follow the schematic for wiring and connections
- Upload the firmware to the Pico (hold boot whilst connecting the USB)
And that's it. The default mappings are for NextDAW but could be modified to your liking by editing the source code.
Demo
Prior Art
Richard Braithwaite's original post is behind Facebook (i.e. not public), but this was his process that spurred the interest in me:
It was simple in concept, but fiddly to pull off. I took the guts of an old PS/2 keyboard and an old un-working midi controller keyboard, bought a load of keyboard switches off ebay, mounted them under the keys of the music keyboard, then wired it all up. Once I shoved the bits from the PS/2 keyboard inside the midi controller, it works surprisingly well.
But for me it wasn't feasible to gut out a MIDI controller so I started looking at how to solve this in a non destructive way.
Version 1: simple or naive but pricier
By "pricey" it's really not that expensive, but there is - at time of writing - an 8 week wait for parts.
What you'll need are:
- Raspberry Pico - this replaces the Arduino from the video - if you're not comfortable with soldering you can buy this with headers.
- USB Host Controller - you'll need to buy it with the "MIDI Device" software option (note that this is the bulk of the costs - I already have a working version that uses only the IC chip which reduces the costs)
- 6-Pin mini DIN plug - or you can buy one that's pre-wired and cut the end you don't need (though you'll need a multi-meter to check the wires at the cut end).
You'll also need some wire and some soldering will be required.
Schematic
The wiring process is relatively straight forward and can be seen in the diagram below:
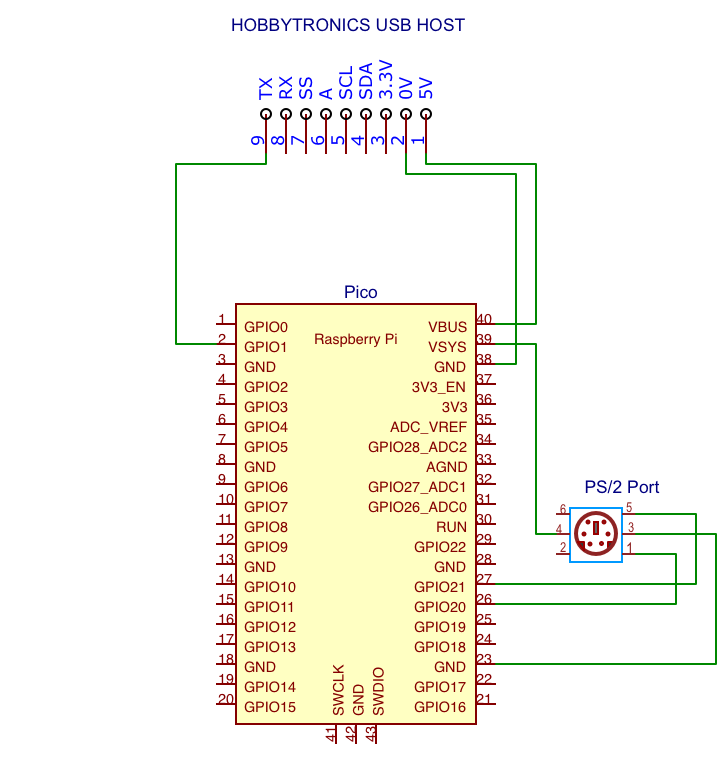
On the USB Host Controller, wire:
- TX to Pico pin 2 / GPIO 1
- 0V (zero volts) to Pico pin 38 (or any other ground)
- 5V to Pico pin 40 / VBUS
On the Pico, besides the pins we've wired already, wire the following to the PS/2 connector:
- Pin 39 / VSYS to PS/2 pin 4 (this is the power input)
- Pin 27 / GPIO 21 to PS/2 pin 5 (clock)
- Pin 26 / GPIO 20 to PS/2 pin 1 (data)
- Pin 32 / GND (or any other ground) to PS/2 pin 3
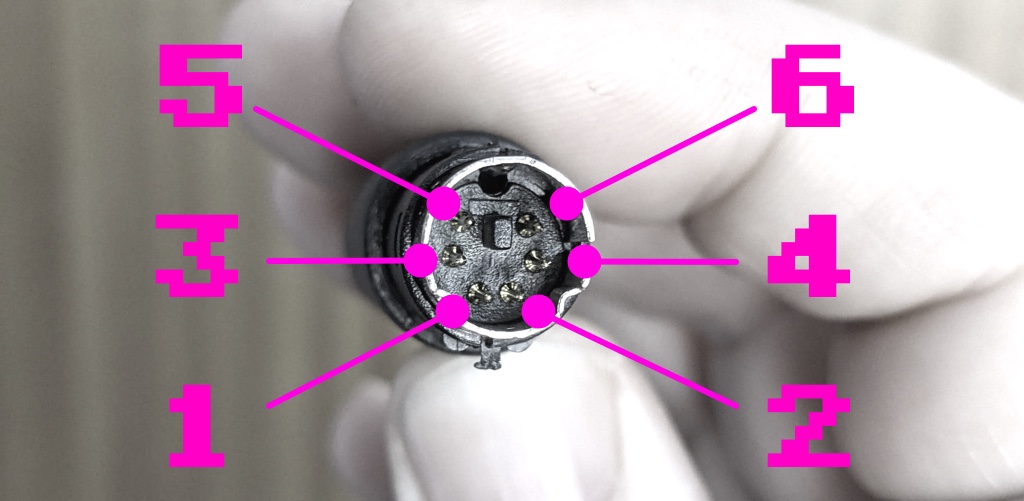
I tend to get my orientation messed up when it comes to the PS/2 connector, so this is what you should be looking for - and you would be wiring from behind this connector into these pins - so remember that pin 1 is on the right when attaching from behind.
The next stage now is the software to translate the data from the USB Host Controller to the PS/2 keyboard key strokes.
Pico Firmware
Firstly ensure the PS/2 connector is disconnected - so that there's no power going to the Pico.
Now to load the firmware you need to hold the "boot" button on the Pico and connect it's USB port (then release the "boot" button). Now you can download and save the pico-midi-to-ps2-v1.uf2 file to the Pico.
Now you're ready to reconnect and play.
Note that the firmware has been configured for NextDAW on the Spectrum so the key mapping is very specific. Currently only the piano keys and a single knob with the CC value of #74 configured for relative change which moves the play head when dialed.
The full source code is available on Github - specifically if you wanted to change the key press mapping. Note that the code is a little brief but moreover uses the Arduino for Pico project (which you can read about here).
As this project progresses, I hope to add more knob and CC mappings to NextDAW functions.
What's next?
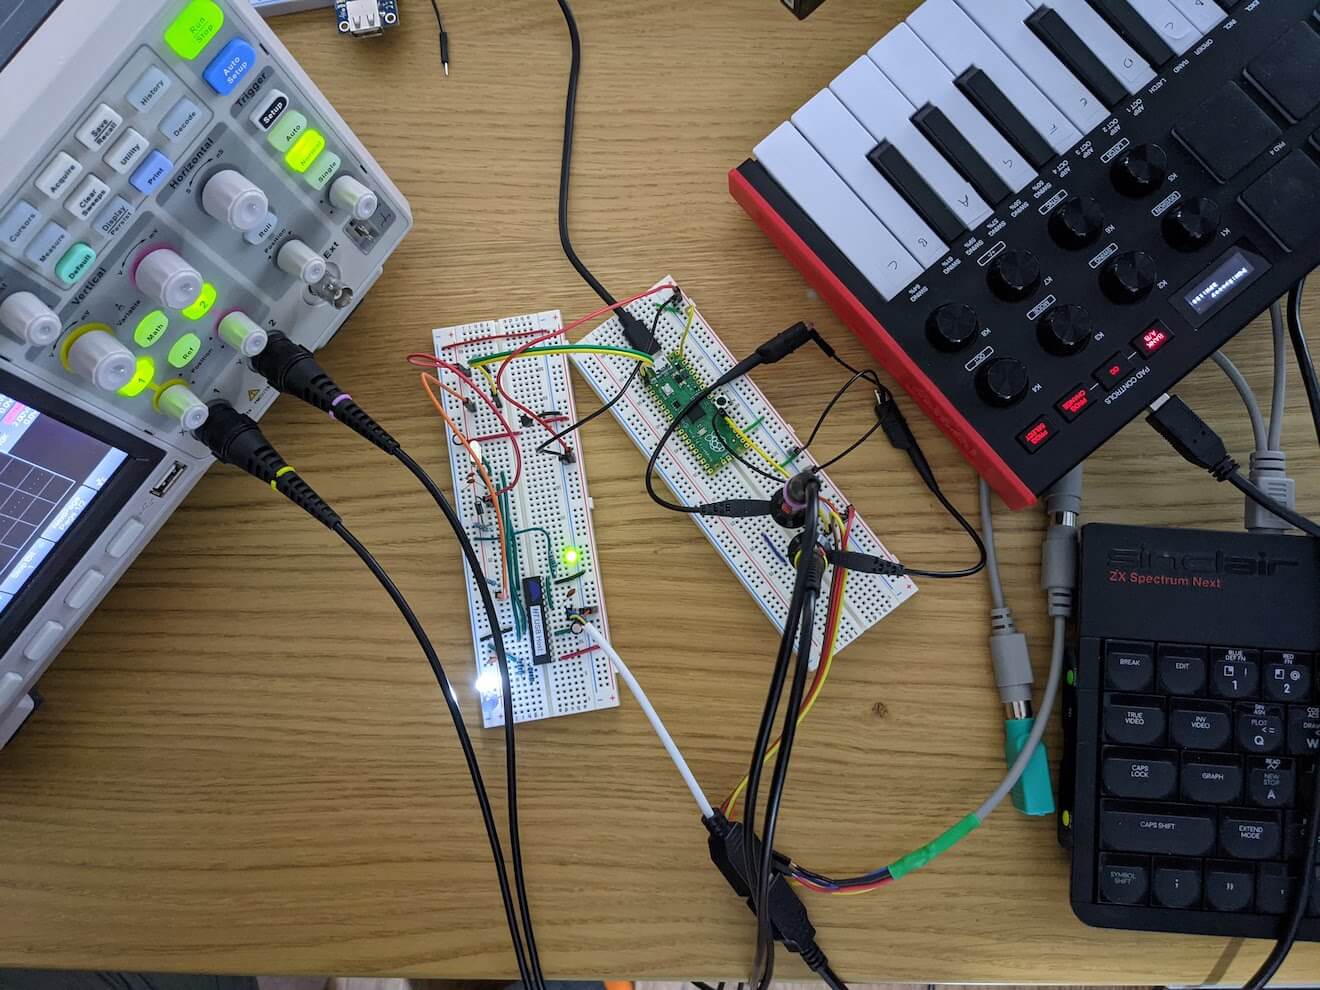
The next stage is to remove the USB Host Controller board in favour of the bare IC - which I've already achieved (see photo below), but it's still in breadboard form so I'd like to clean it up for a single board.
I'm also investigating using the Pico itself as the USB host, though examples are thin and it's an area that I don't have a great depth of knowledge in, but if it works, it means the costs are the Pico, one PS/2 connector and one USB 2.0 to USB mini adapter.
I'll post a follow up in the coming weeks, and again, if you're interested in the project but would rather I do the build for you, please let me know via the enquiry form I've made.