In my evening projects I've been getting into projects that use an ESP module, an ESP 01 specifically, and so I wanted to write up what I've found, how to upgrade (or downgrade) them, common AT commands and general tips either for you my dear reader, or for Future Me when I no doubt forget.
I'm far from an expert and I've read bits around how sometimes these won't work properly, but these notes worked for me - and fair warning: this is intended as a "what I've learned so far".
What is the ESP 01?
The ESP 01 is a very low cost WiFi enabled module that can do both access point and station mode, i.e. you can connect to it or it can connect to your network.
I picked up a pack of 4 on Amazon for £12 (which by comparison is expensive), but I've also seen them for 87p on AliExpress.
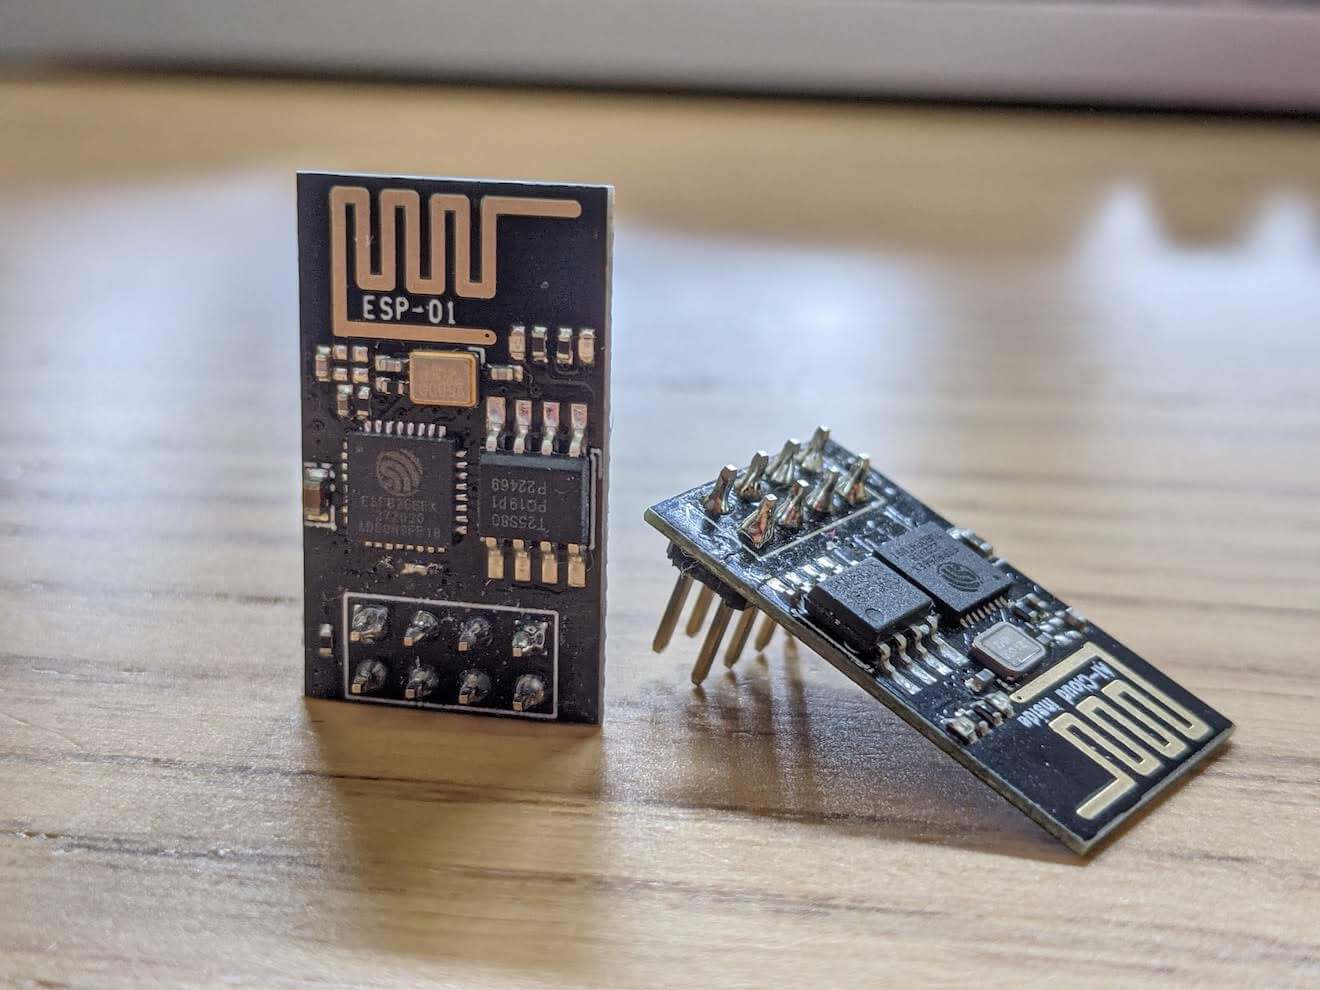
From what I've read, there's two main models, a 1mb version which is black and a 512k version which is blue. I've only ever gotten hold of the 1mb model so I've not tried the 512k version.
Programming and accessing them
You'll notice that the arrangement of pins doesn't complement a breadboard at all. What's useful for programming or testing is to use a USB adapter. However, you can't just wire up power and the TX & RX lines because the pins have to be held in a specific configuration to determine how the chip boots.
What's useful here is a a USB to ESP adapter. I've made my way through a few of them and the one that really worked for me was the OPEN-SMART USB To ESP8266 ESP-01 (Amazon non-affiliate link).
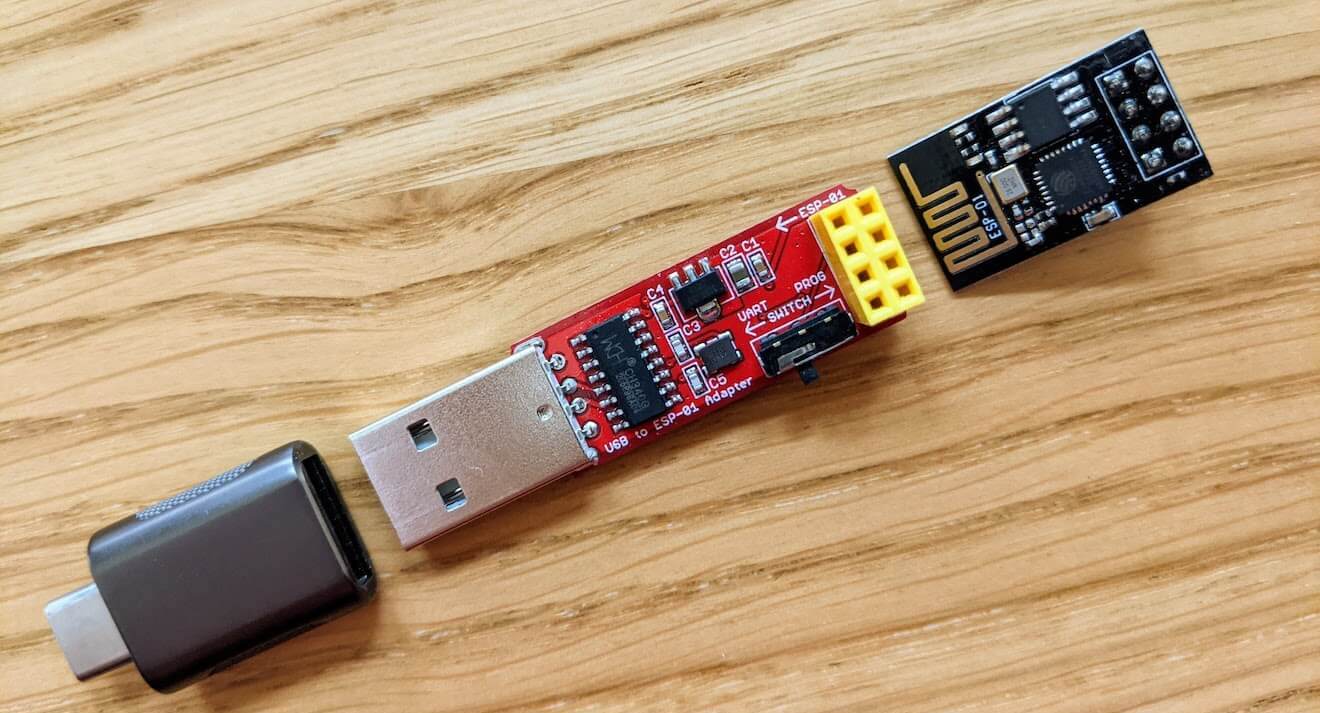
What seems to be particularly important is that the adapter has a CH340G chip onboard. I don't know the details on why, but I've read that the CH340C chip can require soldering the adapter.
macOS crashing is also a thing. This is linked to the CH340 chip it would seem. I had a period of time that I could plug in the USB adapter and pulling it out would cause my mac to fully shutdown right after making a scary "whirring" sound. I now plug the ESP-01 adapter into a USB to USB-C adapter and I've not had another crash since.
Once connected there's two access options: flash or boot. Booting will also let us connect and speak to the device using UART.
Running without the USB adapter
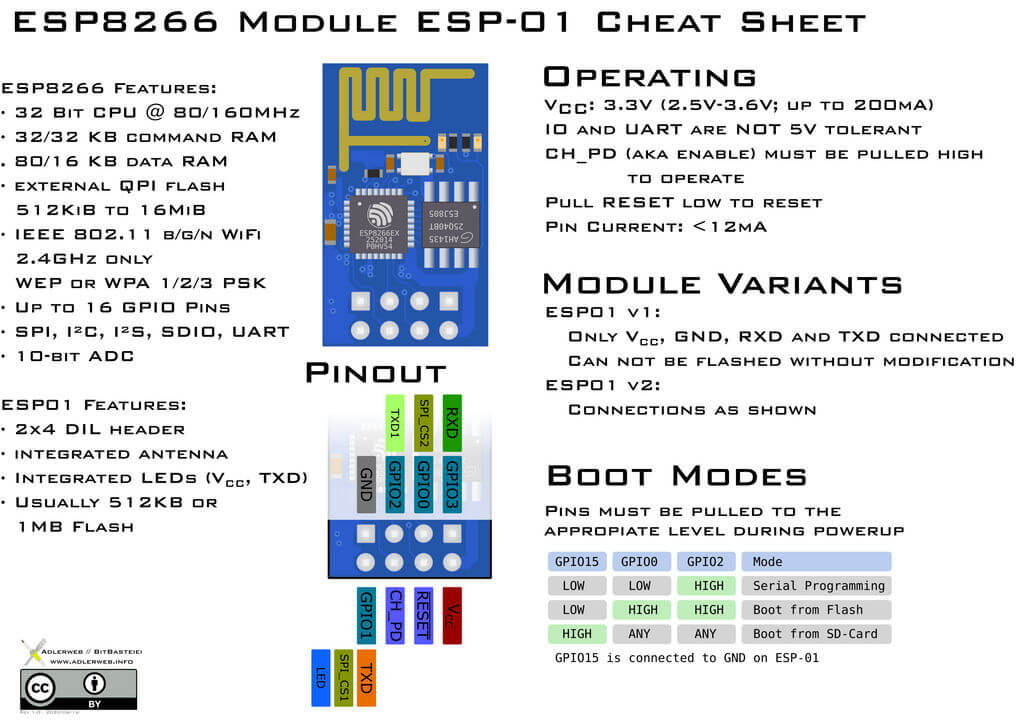
This is a topic that's covered in a lot of places and there's some good resources online so I won't repeat it. This (image by alderweb) has been useful though, specifically to know which pins to hold HIGH during boot:
AT commands
In my projects I'm working with user's ESP modules, i.e. ones that I don't have 100% control over, so I tend to work from a bare minimum set of commands. These are a few of my staple commands:
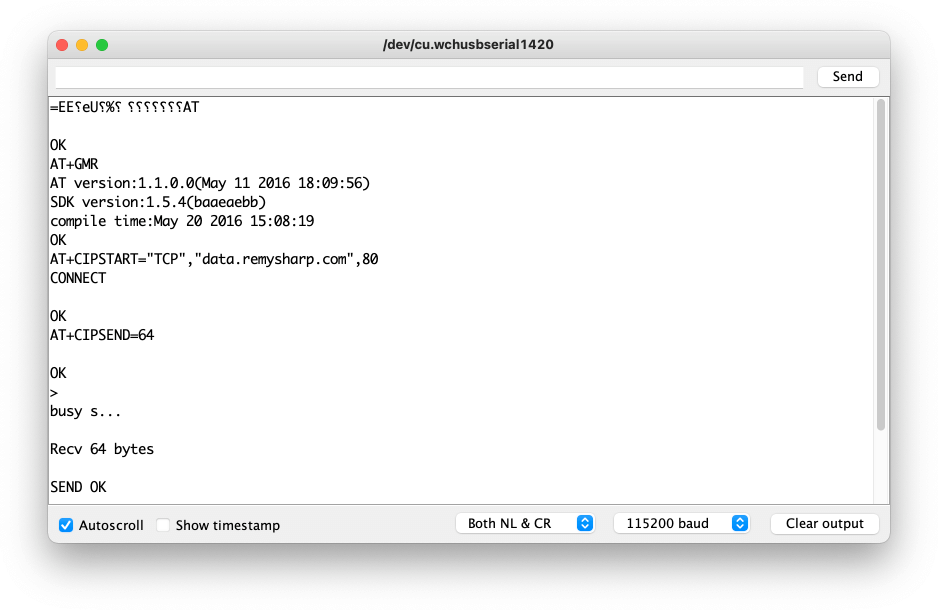
AT- simple "OK" check - should acknowledge withOKAT+GMR- returns the versions for: AT, SDK and compile dateAT+RST- perform a full reset on the ESPAT+CIPSTART="TCP","<hostname>,<port>- connect a TCP requestAT+CIPSEND=64- send 64 bytes to the connected TCP socket, once these bytes are sent, the response will/should start coming down.
The response from AT+CIPSEND=64 - specifically when you define a length, will be chunked into TCP packet and you'll see (typically maximum) of 1,460 bytes separated by +IPD,1460: (though different connectivity might give you a different packet size).
If you want something closer to a raw socket connection that doesn't require parsing the IPD messages, if you send AT+CIPSEND by itself this will start "passthrough mode". However, timing is important when using passthrough mode:
Enter the data sending mode. AT will send a packet every 20 ms or when the data reaches 2048 bytes. When a single packet containing
+++is received, the ESP device will exit the data sending mode under the Wi-Fi passthrough mode. Please wait for at least one second before sending the next AT command.
If you're keen on this mode, I've seen that AT version 1.6 doesn't support this mode at all.
There's a few software you can use to connect to the serial terminal, I tend to use the Arduino monitor which specifically gives me a prompt that I can edit before sending:
Though I can't find any online resources that state which AT commands are supported by which versions, the complete AT command set is available.
For my own projects where I'm the only user of the ESP, I tend to flash the entire ESP with my own code using the ESP8266WiFi library.
Version issues
I've personally tested with:
- 1.1.0.0
- 1.2.0.0
- 1.3.0.0
- 1.6.0.0 and 1.6.2.0
I know that 1.6.0.0 has quirks, two that I found specifically:
AT+CIPSENDdoesn't work, it just errors.- If you make an HTTP request with the header
connection: close, if there's more than (about) 2K of data, the connection will close midway through processing the bytes. It's a bug though I can't find it documented. The solution is to useconnection: keep-aliveand to track the consumed bytes and then manually close the TCP connection withAT+CIPCLOSE.
Flashing AT versions
This part is particularly hard. There's no GUI for macOS (and I would assume linux), and the Windows interface is both cryptic and badly designed - including very large tooltips containing what would seem important information that vanishes in the default 500ms timeout.
There is a method to self update using AT+CIUPDATE but I've yet to have that work - though it's certainly worth a try if all you want is the latest version.
To get a more specific version, the binary downloads can be found here: espressif.com/en/support/download/at
Windows users can use the flash download tool. I managed to flash an ESP to the 1.6 command set using this method below:
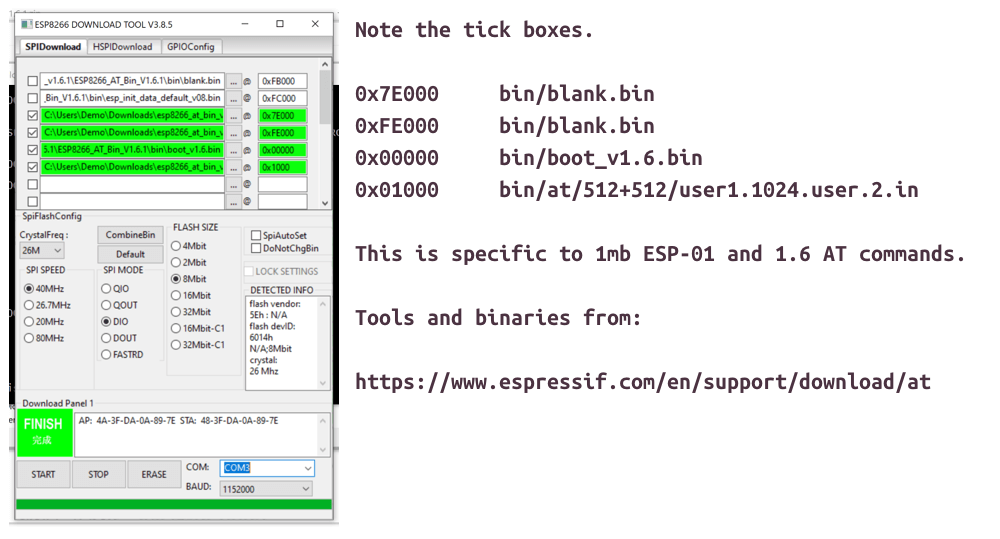
macOS and linux users can use the python tool aptly named esptool. I personally have a bit of battle with "easy installation" when it comes to Python (or Ruby for that matter), so I suspect your milage may vary.
This command should work, but when I personally tried it, my ESP didn't boot up properly, but what's good about the ESP is that (as far as I understand) you can't brick the thing. If the flash is corrupted, you flash again (properly) and it will work.
$ esptool.py --port /dev/tty.wchusbserial1420 write_flash 0x00000 ./bin/boot_v1.6.bin 0x01000 ./bin/at/512+512/user1.1024.new.2.bin 0x7e000 ./bin/blank.bin 0xfe000 ./bin/blank.bin
To get the port, I tend to use the Arduino tool and see what ports are available then connect and test it before running.
There's also a small collection of complete binary flash files - i.e. the total 1mb found here Threetwosevensixseven/espupdate. Mostly you can pull down the .fac file (no idea what the extension is supposed to represent) and write at address 0x0 and it should give you a good clean version of AT commands for the given version (note that it's worth checking the dump.bat if it exists as it'll tell you which file the dump was outputted to).
Data that survives power cycles
If you're using your ESP 01 in station mode (or any ESP for that matter), that is, to connect your local WiFi network, then it must remember the SSID and password. This means it has some kind of writable ROM (an oxymoron, I know).
There's a section called EEPROM (which as far as I understand is "emulated EEPROM" but works the same - it persists after power off) of 512 bytes which means that we can store some arbitrary data.
In fact, the flash layout is structured as so:
|--------------|-------|---------------|--|--|--|--|--|
^              ^       ^               ^     ^
Sketch    OTA update   File system   EEPROM  WiFi config (SDK)
For my own purposes I wanted to have the ESP in a "factory" mode where it starts in an access point mode, you connect to it's SSID (hard coded) and visit the default URL of 192.168.4.1 (this appears to be standard with the ESP8266 Arduino library).
Visiting that URL would serve up a page (that I had written in to my Arduino sketch) asking for your network SSID and the password which the ESP would then save in the EEPROM so that when it reboots it auto connects to your network. Then small configuration settings can be saved there too.
This is non-tested code, but it would work something like this:
#include <EEPROM.h>

unsigned int address = 0x0;

void setup() {
  EEPROM.begin(512); // 512 bytes

  unsigned int flag = EEPROM.read(address);

  if (flag == 0xff) {
    // not configured, start in access point mode and
    // serve pages that ask for SSID details.
  } else {
    // read the
  }
}
There's also another EEPROM library that's supposed to be faster but also supports saving and retrieving structs (for structured config for example).
Things I've not tried yet
- Deep sleep mode - these devices are supposed to least years when in deep sleep, but all my projects thus far have had external power supplies
- I2C over the SDL and SCL lines to offer more buttons/sensors into the ESP
- SSL - actually I have tried it and it failed with the versions I was testing with, but I've not needed to request over https yet from the ESP so I've ignored it for now
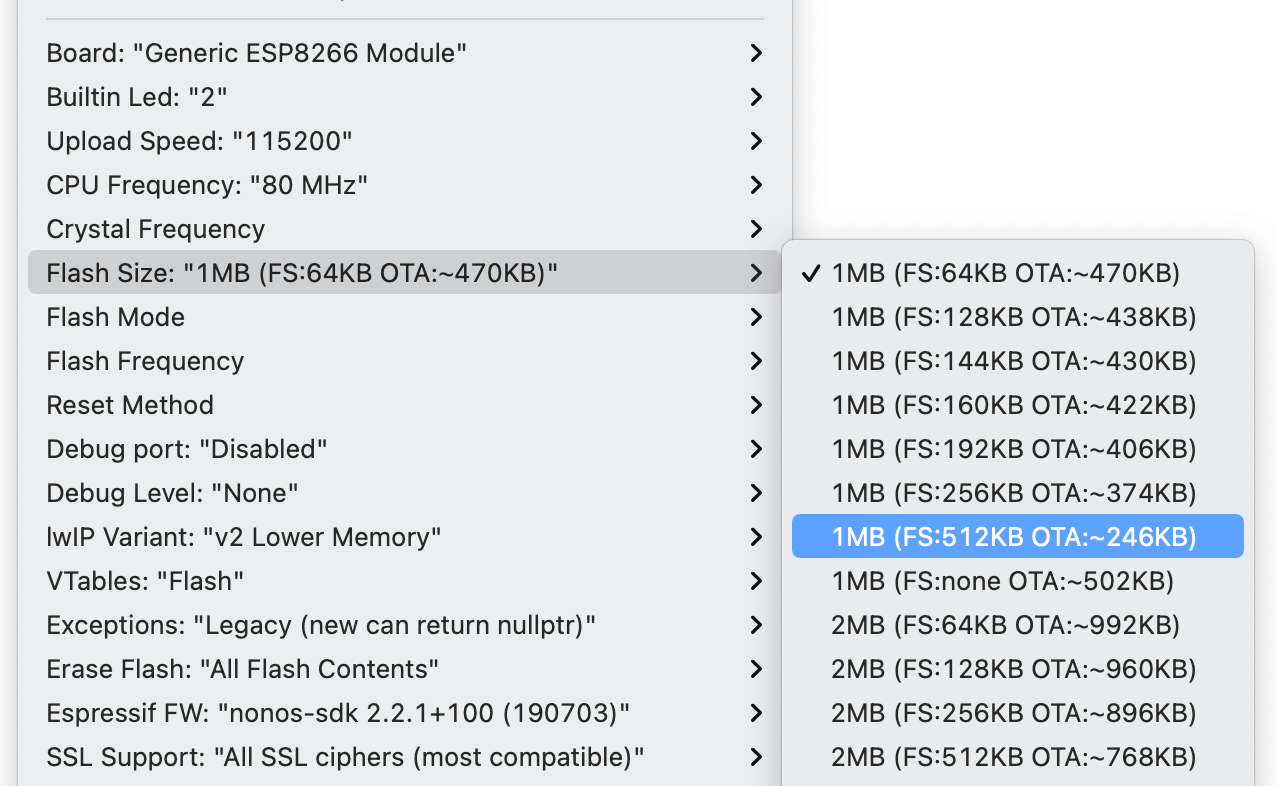
- File System - if you noticed from the memory map above, there's room for files to be stored. From the docs there's a couple of options, but this means that if I'm serving a web page, I can put the static assets (like JavaScript, CSS and images) in this space instead of having to dump it all in the sketch itself. It also looks like there's a few options on how much space you can have too:
Wrapping up
So that's my brain unloaded. There's a tonne of resources out on the web and in youtube/video form. I definitely struggled with flashing to different AT versions using a mac, but hopefully that'll be the last time.
My projects I'm using these for are a second revision of my PS/2 remote (shrunk down from a ESP32 to the ESP-01), a game for my daughter that connects to our WiFi to control her lights and finally I've been writing a Spectrum Next tool for requesting data over the web so I've had to get very intimate with the ESP-01 which sits on the Spectrum's motherboard.